Menu
Doro Week discounts!
Doro Week discounts!
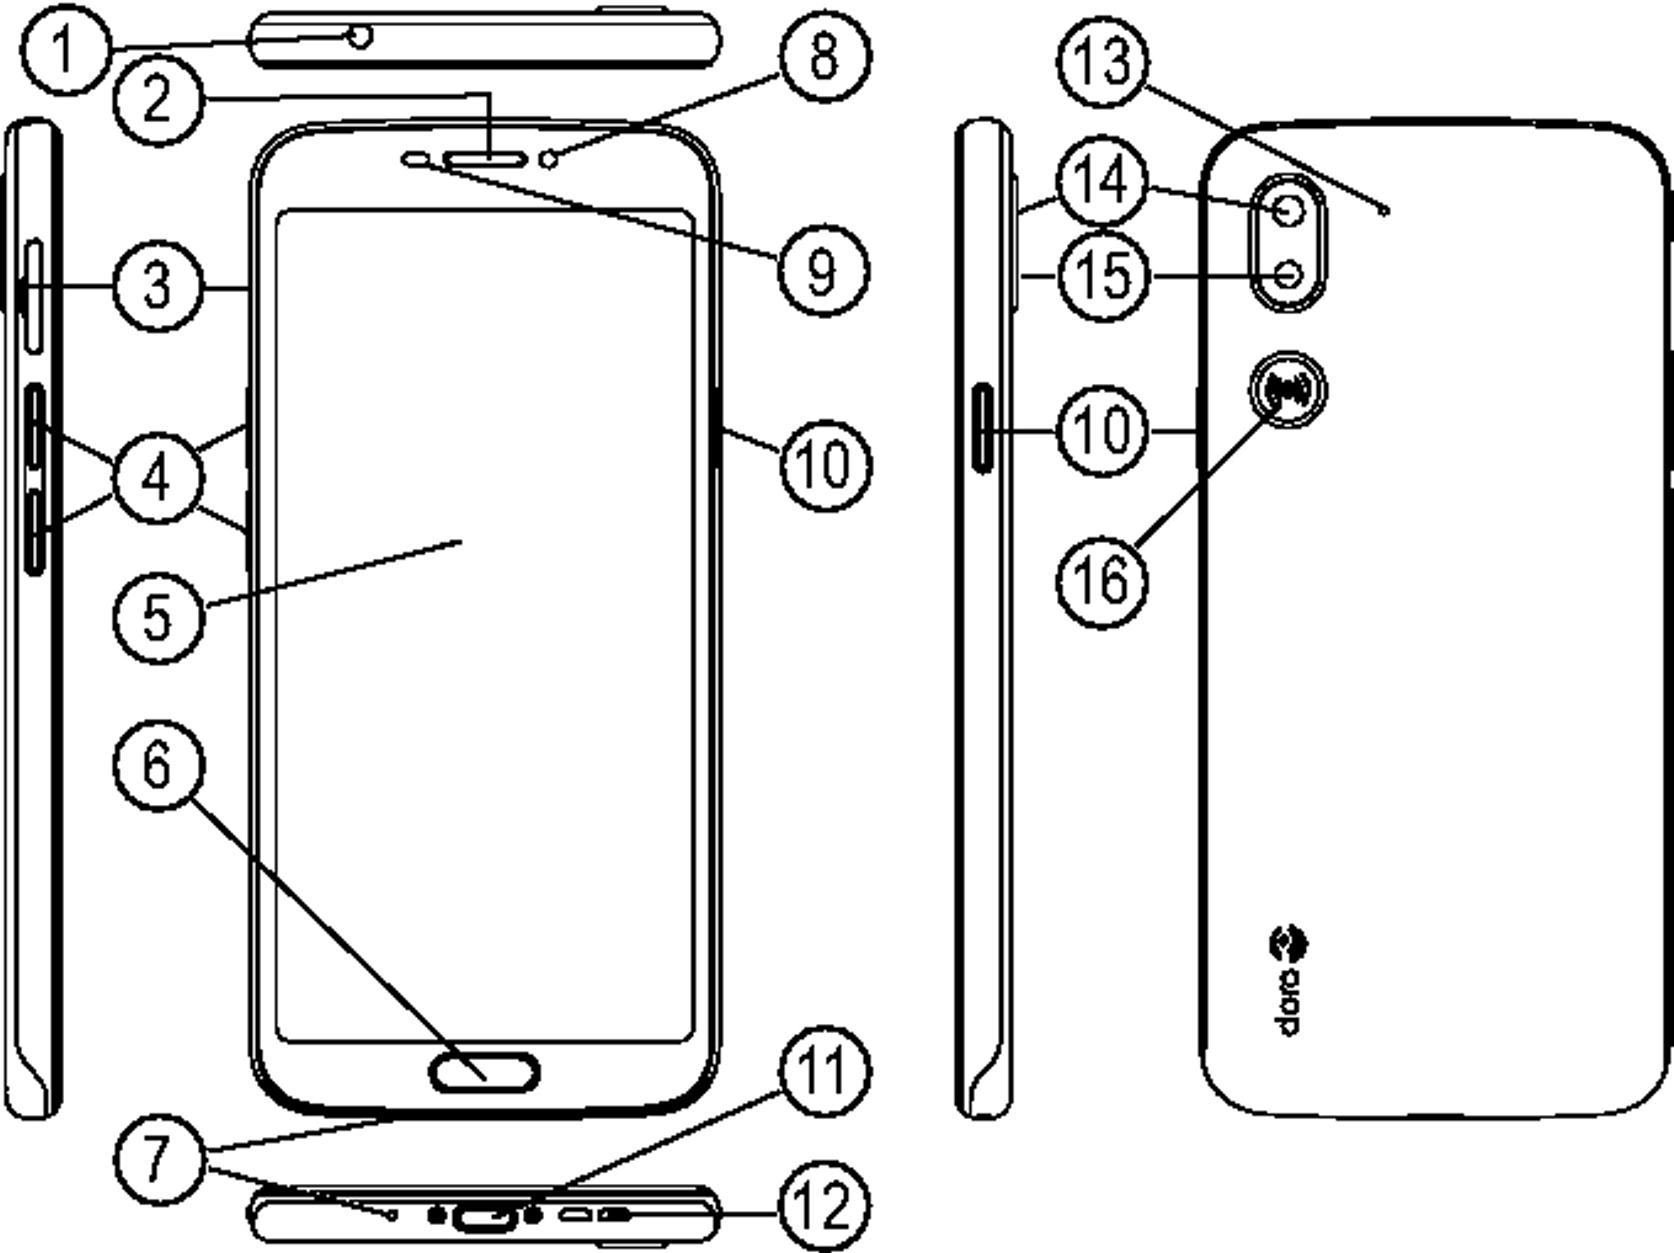
1. Headset port, for standard headset with 3.5 mm phone jack
2. Earpiece, for phone calls with the phone by the ear
3. SIM/SD card tray
4. Volume buttons
5. Touch display
6. Home key/fingerprint sensor
7. Microphone
8. Front camera, selfie camera
9. Proximity sensor, turns off the touch display when the phone is held by the ear
10. Power button, press and hold to turn phone on/off
11. USB port Type-C, for battery charging or connection to other device like a computer
12. Loudspeaker, for hands-free mode
13. Second microphone
14. Rear camera
15. Camera flash/torch
16. Assistance button, must be setup before use, see full manual for more information
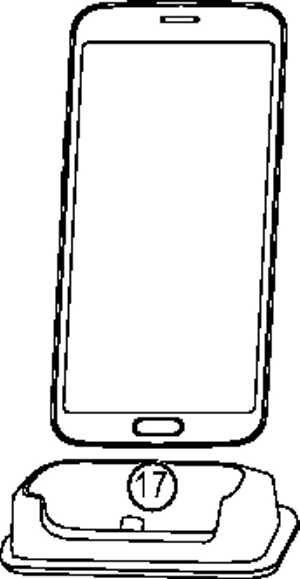
17. Charging cradle (optional accessory)
| How to set up your Doro 8080 |
When you first get your phone, there is a few actions that you need to take before starting to use it.
The first step is to unbox the phone and assess the items and equipment included in the delivery. Make sure to read through the manual so you can familiarise yourself with the equipment and the basic functions. For more information about accessories or other Doro products please visit www.doro.com or contact our Helpline.
Before you start using your new phone you may need:
| Caution | |
|
Turn off the phone and disconnect the charger before removing the SIM/memory card tray. |
|
|
Use your fingernail or other similar object, to gently pull out the SIM/memory card tray.
|
 |
||||
|
  |
| Caution | |
|
This device accepts nano-SIM or 4FF SIM card. Using a modified incompatible SIM card that is thicker than a nano-SIM card may damage the card itself, the card slot and corrupt any data stored on the card. Use only compatible memory cards with this device. Compatible card type: microSD, microSDHC, microSDXC. Incompatible cards may damage the card itself, the device and corrupt any data stored on the card. Some phones may have a pre-installed memory card. Take care not to scratch or bend the contacts on the memory or SIM card when inserting them into the card tray. |
|
See External memory, p. for additional info.
While it's possible that your phone will already come with enough charge to be powered on right out of the box, we recommend to fully charge it before first use.
| Caution | |
|
Only use chargers and accessories that have been approved for use with this particular model. Connecting other accessories may be dangerous and may invalidate the phone's type approval and warranty. |
|

If the phone is turned off during charging, the phone is still charging. Press the Power button to view charging status.
Save energy
When you have fully charged the battery and disconnected the charger from the device, unplug the charger from the wall socket.
If the battery is completely discharged, the device cannot be turned on immediately when the charger is connected. Allow a depleted battery to charge for a few minutes before turning on the device.
If the wrong PIN code is entered several times Enter PUK is displayed and you need to enter your PUK code (Personal Unblocking Key). Contact your service provider for more information about PIN and PUK code. See Change the SIM PIN code, p. for information about changing the PIN code.
| Get to know your phone |
Before you start to use your new phone, remove the protection film that covers the device. Please note the helpful directions that is printed on the protection film.
Screen covers and protectors may help you protect your device against damage. Only use screen covers and other protections intended for your device. Third party protection accessories may prevent your device from working correctly by covering sensors, lenses, speakers, or microphones.
The first time you start your device, a Start-up wizard helps you to setup basic settings, customise your device and sign in to your accounts, for example a Google™ account.
The device language is normally determined by the inserted SIM card, but you may change the language if you want. All settings presented in the Start-up wizard can also be changed later if you are unsure what to do.
You will also get some quick tutorials of how to handle your phone. Find more tutorials at ![]() Help, p..
Help, p..
| Important! | |
|
You need an Internet connection to use this service. It is recommended to use Wi-Fi connections when available to reduce costs for data traffic. Contact your service provider for detailed subscription costs before activating. |
To be able to fully use your new smartphone you need a Google™ Account. One free account gives you access to free Google products like Gmail™, YouTube™, Google Maps™, Google Drive™, Google Photos™ and other Google product. It’s a convenient way to manage your phone’s applications, contacts, calendar events, reminders and more. You can also back up your information in case you should lose your phone. You don't have to use any of the specific Google services like Gmail on a daily basis if you don't want to, and you can add other email accounts to your phone.
| Important! | |
|
It is crucial that you remember your Google account username and password. During a factory settings restoration or microSD card-based update, Google's anti-theft mechanism requires you to enter the Google account your phone last logged in to on the startup navigation screen for identity authentication. Your phone can properly power on only after the identity authentication passes. Also, if you have more than one Google account, make sure to enter the details for the relevant account. |
Your new phone runs on Android™. Android™ is a mobile operating system developed by Google™. It is based on a version of Linux and other open source software, and is designed primarily for touchscreen mobile devices such as smartphones and tablets.
You can find more help regarding Android™ on support.google.com/android/.
Android™ is also associated with a suite of software developed by Google™, called Google Mobile Services (GMS), that are pre-installed on this device. This includes apps such as Gmail, the application store Google Play, the Google Chrome web browser and Google Search app.
You can find more help regarding the apps in Google Mobile Services (GMS) on support.google.com. Select the app you need help with.
Use the symbols to guide you through supporting sections in the manual.

| Caution | |
|
Avoid scratching the touch screen, do not tap it with anything sharp or allow the touch screen to come into contact with water. Do not touch the screen if the glass is cracked or shattered. |
|
The Home screen is your start screen on your Doro 8080, and here you can collect the apps and your favourite contacts that you use most often. You can also set your favourite picture as wallpaper. Use the Google™ search bar to quickly find what you are looking for. To manage shortcuts on the Home screen see My widgets, p..
The screen turns off and locks when you are not using the phone. The lock screen can show time and date as well as notifications like missed calls or messages.
The screen lock prevents unwanted actions on the touch screen when you are not using the phone.
You can change the way that you unlock the screen to prevent others from accessing your personal information.
Tap to select one of the following:
| Important! | |
|
It makes sense to choose a password, PIN code or a pattern that is easy to remember, but try to make it difficult enough so that others can’t guess it. The password, PIN code or pattern screen lock, together with your Google account login is the basis for the anti-theft features on this phone. Enabling a secure screen lock and having a Google account on your phone will make it difficult for a thief or other person getting access to your personal data or even resetting your phone. Keep the secure screen lock information and Google account login stored in a safe place!, see Reset the phone, p.. |
In order for fingerprint recognition to work, your fingerprint information needs to be registered and stored in your device. After registering, you can set the device to use your fingerprint for screen unlock and other features, like Google Pay™.
Fingerprint recognition uses the unique characteristics of each fingerprint to enhance the security of your device. The likelihood of the fingerprint sensor not will be able to differentiate two different fingerprints is very low. However, in rare cases where different fingerprints are very similar the sensor might recognise them as identical.
If you use fingerprint as a screen unlock method, you cannot use your fingerprint to unlock the screen after turning on the device or reboot. The first time you must unlock the screen using the pattern, PIN, or password you set when registering the fingerprint. Be careful not to forget your pattern, PIN, or password.
If your fingerprint is not recognised, unlock the device using the pattern, PIN, or password you set when registering the fingerprint, and then re-register your fingerprints. If your pattern, PIN, or password is forgotten, you will not be able to use the device if you do not reset it. Doro is not responsible for any data loss or inconvenience caused by forgotten codes.
If you change the screen lock method to Swipe or None, which are not secure, all of your fingerprint data will be deleted. If you want to use your fingerprint data again, you must re-register your fingerprint data.
When you scan a fingerprint on the phone, the following conditions may affect the fingerprint performance:

Alternatively, tap Add another to add more fingerprints. You can add up to 5 fingerprints.
Tap on a fingerprint if you want to name it, like “Right indexfinger”.
Press ![]() if you want to delete a fingerprint.
if you want to delete a fingerprint.

![]() is only visible if Swipe up on Home button is deactivated, see Swipe up on Home button, p..
is only visible if Swipe up on Home button is deactivated, see Swipe up on Home button, p..
| Important! | |
|
You need an Internet connection and a Google account (see, Sign in to Google™, p.) to use this service. It is recommended to use Wi-Fi connections when available to reduce costs for data traffic. Contact your service provider for detailed subscription costs before activating. |
To set up Wi-Fi, see Connect to Internet using wireless networks (Wi-Fi), p..
Tap ![]() in the command bar to open a panel which contains several shortcuts to ease your phone use.
in the command bar to open a panel which contains several shortcuts to ease your phone use.
Tap to return to the previous screen, or to close a dialog box, menu, or keyboard.
Tap the settings icon ![]() on the bottom for more sound and volume options.
on the bottom for more sound and volume options.
These settings can be found via ![]() Set
Set ![]()
![]() Advanced settings
Advanced settings ![]() System
System ![]() Navigation.
Navigation.
Activate this to quickly open camera by pressing the power button twice. Works from any screen.
With this version of Android there’s a feature called Swipe up on Home button. Activate this to swipe up on the Home button to switch apps. When activated, you no longer have an Overview button on the bottom of your screen.
Apps in this view are "live" — you can select, copy and paste text while in the multitasking view.
Activate this to tap the screen twice to wake up device.
Select what the phone will do when it rings and you press shortcut to prevent ringing, Power & Volume Up together.
Activate this to display ![]() in the command bar.
in the command bar. ![]() opens a panel which contains several shortcuts to ease your phone use.
opens a panel which contains several shortcuts to ease your phone use.
Android smart phones like your Doro 8080, as well as most Android applications, feature common icons. Many icons that you see on-screen are actually buttons on the touchscreen. If you don’t see the text, images or information that you want, try to touch the screen or to tap an icon for a pick list or to reach another menu.
|
|
more options (available in the action bar or in apps). |
|
|
enabled functions. |
|
|
disabled functions. |
Application is another word for program or software, a common way to shorten the term application is App. The application screen contains the applications that come pre-installed on your Doro 8080 and any other apps that you choose to install. The applications screen extends beyond the regular screen, so you need to scroll down to view all content.
To install/uninstall applications, see Google™ Play Store, p..
The status bar, located at the top of your screen, shows signal strength, ongoing and new applications as well as battery status.
Open the notification panel to view more information about the icons in the status bar, to view your notifications and manage the quick settings like Wi‑Fi or Torch.
|
To open the notification panel, swipe the status bar down. |
 |
|
To close the notification panel, swipe up twice, or tap |
 |
All app notifications appear on the lock screen ready for viewing. Not only that, but you can interact with them as well. Depending on the notification in question you can:
Swipe the status bar down to open the Quick settings panel. Tapping an icon enables you to manage the feature directly within the Quick Settings panel, like toggling the flashlight on and off, or enable/disable the Wi-Fi. Long pressing an icon jumps into the corresponding page within Android’s Settings for full control.
Swiping down once from the top of your phone’s screen shows your notifications as well as a quick access bar containing the first five tiles in your Quick Settings panel.
You can enter text, numbers and other characters using the on-screen keyboard. Select a text field to open the on-screen keyboard. You can adjust your on-screen keyboard in various ways to improve readability.
The Shift-key ![]() is found to the lower left of your keyboard. Capitalisation is activated when you start entering text. Capitalisation means writing a word with its first letter in uppercase and the remaining letters in lowercase.
is found to the lower left of your keyboard. Capitalisation is activated when you start entering text. Capitalisation means writing a word with its first letter in uppercase and the remaining letters in lowercase.
Start entering text and the dictionary suggests words based on the keys you have selected. When you’re done typing something, you can go back and tap a misspelled or mistakenly autocorrected word. Tap the misspelled or mistakenly autocorrected word to select other possible auto corrections. This is the easiest way to fix mistakes — if you don’t find the word you wanted, use the Backspace key to erase and type a new word.
Cut, Copy, Share, Select all and Paste are features available when writing e an email, text message/box, or basically anywhere.
You can select to personalise your keyboard, depending on the selected keyboard.
It's easy and often useful to get a snapshot of your phone’s screen, a screenshot. To view the screenshot, see Handle pictures in the Gallery, p..
Your smartphone Doro 8080 is just like any other mobile phone - you can make calls and send texts. But you can also access the Internet, send and receive emails, install apps and games, and check your social networking sites, like Facebook and Twitter, for this you need to be connected to Internet. Unless you configured an internet access in the startup wizard, when first starting your phone, here are the instructions on how to do it.
Use Wi-Fi to connect your phone to the Internet instead of the mobile network. You may already have Wi-Fi in your home and it's often available at workplaces. Take advantage of free networks in coffee shops, hotels, trains and libraries. Connecting to the Internet with Wi-Fi doesn’t incur additional data traffic costs, unless you have to pay to get on the wireless network.
Use Mobile data to connect your phone to a network provider with a data traffic plan. What that means is that your phone can connect to the Internet anytime it is in range of your operators mobile network a service you pay for through a monthly data traffic plan. And there may be a limit to the amount of data you can use per month. You can limit your data usage by turning off mobile data. You'll then not be able to access the internet using the mobile network. You can still use Wi-Fi even though mobile data is turned off.
Your device is approved for use on the 4G LTE: 1 (2100), 3 (1800), 7 (2600), 8 (900 MHz), 20 (800), 28 (700), 38 (2600) MHz / WCDMA: 1 (2100), 2 (1900), 5 (850), 8 (900) MHz / GSM: 850, 900, 1800, 1900 MHz networks. To use the device, you need a subscription with a service provider.
Using network services may result in traffic costs. Some product features require support from the network, and you may need to subscribe to them.
Some operations and features are SIM card and/or network dependent or dependent on the compatibility of devices and the content formats supported. Some services are subject to a separate charge.
When you travel with your device and you are switched from your own network operator's network to another, it’s called roaming. The roaming state allows you to be reachable and you can make or receive phone calls regardless of where you are, but it almost always involves a surcharge for using another operator's network. If you need to access the Internet or other data services using mobile data traffic, then you need to activate data roaming. To limit your data usage when abroad roaming is Off as default.
Once activated, the battery saver mode, helps to increase battery life. The battery saver is designed to start functioning when the battery level of your phone reaches a certain level. To save battery many features are slowed down, such as: background syncing, vibrations (vibrate on touch will be lost), email and/or message processes and more.
Here are some tips on how you may extend the phone’s battery power by reducing battery consumption.
| Navigate your phone |
While Doro smartphones offer as true an Android experience as there is, we take simplicity even further thanks to our intuitive, action-based interface, EVA. EVA makes using a smartphone even easier. It’s like having someone who understands your needs always by your side. Users never need to look around for things they can’t find. EVA simply gives them a few clear choices, and then does what the user wishes based on their response. She’s also the perfect companion when starting up the phone for the first time, guiding the user every step of the way. And because she is designed by Doro, EVA makes the technology fun, available and easy for everyone, whether new to Android, or a long-time user and fan.
Doro's unique telephone menu is action-based and allows you to navigate your phone, by just asking yourself, What do I want to do?
For example, send an email to a contact that is available in your contact book.
To call someone.
|
|
A number to enter a phone number, see Calls, p.. |
|
|
A contact to make a call from your contact book. For more info see Calls, p. or Contacts, p.. |
|
|
A recent contact to call from the call log, see Call log, p. |
|
|
Voicemail to call your voicemail, see Call settings, p.. |
To reach many of the most frequently used apps.
|
|
My messages to view messages. |
|
|
My emails to view emails, create or add an email account, see Email, p. |
|
|
My call history to view call logs, see Call log, p. |
|
|
My pictures and videos to view stored images and videos, see Handle pictures in the Gallery, p. |
|
|
My contacts to see and handle your ICE card (In Case of Emergency), see Contacts, p. |
|
|
My calendar to see the calendar and your events, see Calendar, p. |
|
|
My notes to see your notes, see My notes, p.. |
|
|
My location to go to Google maps and find your location, search for addresses, find your way and more. |
|
|
My applications to reach your apps, see My applications screen, p.. |
|
|
My phone information to view information and data about your phone, see My phone information, p.. |
To send and share messages, email, pictures and more from your phone.
|
|
A message see Write messages, p. |
|
|
An email , see Write emails, p. |
|
|
A picture or a video to send a picture or video. To view stored images and videos, see Handle pictures in the Gallery, p. |
|
|
My location to send your present location. |
To find information on the Internet, your way to a place or find out what music you are listening to.
|
|
Something on the Internet to search the Internet, see Internet (Web browser), p.. |
|
|
Directions, an address, a place to find an address, a place or your way from your current position. |
|
|
Around me to find useful facilities nearby your current position. |
|
|
What song is playing now to search the name of that of song/melody that you hear. |
|
|
Something in my phone to search your phone for contacts, applications and downloaded files. |
To add new contacts, notes, alarms, events etc.
|
|
A contact to create a new contact, see Add new contact, p.. |
|
|
A note to write a note, see My notes, p.. |
|
|
An alarm to set an alarm or reminder, see Alarm, p.. |
|
|
A timer to set timer, see Timer, p.. |
|
|
An event to book an event and get a reminder at the start time, see Calendar, p.. |
|
|
An application to add new applications, see Google™ Play Store, p.. |
Step by step tutorials for you to discover more features of your phone
|
|
Tutorials to find helpful tutorials for your phone. |
To manage the settings of your phone.
|
|
My alarms to set an alarm, see Alarm, p.. |
|
|
My internet connection to activate and set up your Internet connection, see Connect to the Internet, p.. |
|
|
My other connections to activate and set your connection with The Bluetooth connection or The geolocation options, see The Bluetooth connection®, p. or Location based services, p.. |
|
|
My homepage to personalise the Home screen with your own wallpaper and widgets, see My Wallpaper, p. and My widgets, p.. |
|
|
An assistance option to set your assistance button and manage your ICE information (In Case of Emergency) card, see My assistance button |
|
|
My audio setup for voice calls to set the ringtone, the volume and to manage phone audio settings. You can configure the audio settings with your hearing aid, see My audio setup for voice calls |
|
|
My messaging apps to enable or disable the display of additional messaging apps in Send/View messages actions. |
|
|
Advanced settings to set screen’s brightness, sounds volume and vibration on/off, Haptic feedback (vibration on/off when you touch the screen), storing in the phone or on the memory card, the phone’s language, date and time, and the more advanced Android settings. |
| Phone settings |
Your phone should already be set to the correct time, date, time format and time zone, these are provided by your network operator. If not, you can set it yourself. Do as follows to reach the settings:
Wallpaper is the background on the Home screen and on the Lock screen. You can change the wallpaper image into any image, such as a picture you've taken or pre-loaded images.
Widget is a smart feature in Android phones. A widget works like a mini-application or informative window that is also a shortcut to a larger other app on your device. With a Widget you do not have to open the App, the Widget runs directly on the home screen, showing you the information. Widgets often take the form of on-screen devices such as clocks, event countdowns, auction-tickers, stock market tickers, flight arrival information, daily weather etc..
You can place even more widgets on the Home screen by following these steps.
Some apps show a dot, a small marking above the individual app icon, when you get notifications.
With this feature enabled, you will automatically get an app icon on your home screen when you install a new app.
You can adjust the brightness of the screen or totally let the system handle it. The Adaptive Brightness setting lets the system determine the optimal brightness for your smartphone. It’s an automatic setting, just enable it and it will raise or lower the brightness depending on the light in your current environment. This is not only intended to save you time manually altering brightness settings, but also to improve battery life; your smartphone should always be bright enough for your needs but not so bright that it’s consuming more battery than is necessary.
You can set the length of time the device waits before turning off the display backlight.
Adjust the text size to make your screen easier to see.
Adjust to make items on your screen smaller or larger.
The colour correction setting enables your device to compensate for colour blindness.
Colour inversion exchanges colour values. For example, black text on a white screen becomes white text on a black screen.
Adjust volume levels for various sounds on your device.
You can also press the volume keys to adjust the volume. During a call the volume keys adjusts the call volume and from standby they adjust the media volume.
Adjust settings for various sounds on your device.
If you use a hearing aid or have hearing difficulties when using the telephone in a noisy environment, you can customise the phones audio settings.
This telephone is hearing aid compatible. Hearing aid compatibility is not a guarantee that a specific hearing aid will work with a specific telephone. Mobile telephones contain radio transmitters that may interfere with hearing aid performance. This phone has been tested for use with hearing aids, for some of the wireless technologies that it uses, but there may be some newer wireless technologies that have not been tested yet for use with hearing aids. To ensure that a specific hearing aid works well with this telephone, test them together before making a purchase.
The standard for hearing aid compatibility contains two types of ratings:
Improve accessibility further with features that make the device easier to use for users who have impaired vision, hearing, and reduced dexterity.
You can connect wirelessly to other Bluetooth® compatible devices such as headsets or other phones.
In Aeroplane mode you can’t make or receive calls, surf the web or download emails, or do anything that requires an Internet connection, this is to prevent disturbance to sensitive equipment. You can still play games, listen to music, watch videos and other content, as long as all this content is saved on your memory card or internal storage.
When you take your phone abroad, you can keep it in flight mode. If you do that, there’s no chance of data roaming charges, and you can still enable Wi-Fi. Enable Aeroplane mode when in areas with no network coverage to save battery since the phone repeatedly scans for available networks and this consumes power. You can be notified by alarms, if alarms are activated.
![]() is shown in the status bar when enabled.
is shown in the status bar when enabled.

Connect the phone to a computer and start transferring pictures, music and other file types. All you have to do is connect a USB cable between the phone and computer. From your computer's file explorer, you can drag and drop content between your phone and the computer.
Mac users, see https://www.android.com/filetransfer/.
To access device information such as the current software version, battery status or to update device software.
When your device is connected to a Wi-Fi network it's directly updated to the latest software by the firmware over-the-air (FOTA) service.
| Important! | |
|
We recommend that you always update your device to the latest software version to get optimal performance and the latest enhancements. When a new software is available, a notification message is shown in the status bar, or as a notification. Select it to start downloading. The download time may vary depending on Internet connection. |
Your Google account information is set to back up automatically. Follow below settings to make sure your contacts, system settings, apps, calendar, and email will be restored whenever you set up a new device with that same Google account.
There are many apps that allow you to backup your photos, applications and much more. Some apps even offer cloud storage that allows mobile uploading, and others that allow you to restore your data should you need to. Try searching ![]() Play Store, see Google™ Play Store, p.
Play Store, see Google™ Play Store, p.
The reason to perform a reboot might be a persistent problem that is impossible to solve or if your device becomes frozen and unresponsive. This device has an internal battery and therefore the hardware cannot be rebooted by removal of the battery.
| Important! | |
|
Resetting the phone means that most information, such as downloaded and installed applications, accounts, system and application data and settings, will be erased. Be sure to backup any data and files you want to keep before you perform the reset. A backup is a safety copy of information. Carefully read all the text below before you start. |
The reason to perform a reset might be a persistent problem that is impossible to solve or if you want to pass the phone to someone else.
| Important! | |
|
Remember the Google account your phone last logged in to. During a reset Google's anti-theft mechanism requires you to enter the Google account your phone last logged in to on the startup navigation screen for identity authentication. Your phone can properly power on only after the identity authentication passes. |
You will not lose any app data or the app itself, only any changed settings for the app.
| Caution | |
|
This is the last step before ALL data from the device, including Google or other account settings, system and application data and settings will be permanently erased. |
|
Your phone has different types of memory and storage possibilities.
The internal storage is used to store downloaded or transferred content along with your personal settings and data. Examples are alarm, volume and language settings, emails, bookmarks, contacts, calendar events, photos, videos and music.
You can use an external memory card to get more storage space or as a portable memory. There are many different media card standards, use only compatible memory cards. Compatible card type for this device: microSD, microSDHC, microSDXC max 128 GB. SD stands for Secure Digital. Lower-capacity cards store less information. The phone works with or without an SD card installed. We suggest you to use a high speed memory card, especially if used as extended internal memory. Most applications can read data from a memory card but only certain apps can save files to this type of memory. You can, for example, set the camera application to save photos directly to the memory card.
The memory in your device tends to fill up as a result of normal usage. If your phone starts to slow down, or applications suddenly shut down, consider the following:
When you are surfing the web or using apps on your phone, that will create temporary files stored on your phone in an area of memory called cache. The reason is that the next time you visit the same website or app the phone will load it from cache memory instead of downloading everything again from the server which, take up time and bandwidth. These files will overtime become obsolete and will then be called Junk files. Follow below to delete Junk files and other files.
All purchases are managed by your Google account. If you want to install a particular app again later on, as long as you are signed in with your original Google account you won’t be charged again for the same app.
| Warning | |
|
If the SIM card is lost/stolen it is unprotected. |
|
| Google™ Play Store |
| Important! | |
|
You need an Internet connection to use this service. It is recommended to use Wi-Fi connections when available to reduce costs for data traffic. Contact your service provider for detailed subscription costs. |
Browse the available applications and games through different categories or through the lists like Top paid and Top Free. You can also search for a specific application or game.
Some applications need to be purchased. The cost is shown in the application description, the same goes if the application is free. You pay using Google™ Pay, which can be registered when setting up a Google™ account or the first time for a purchase.
| Calls |
To call a contact that is currently not available in your contact book, see also ![]() Call, p..
Call, p..
The phone rings or vibrates to alert you to an incoming call.
The sound you hear when the phone rings is known as the ringtone, see Ringtone and other tones, p.. You can set your phone to play a number of ringtones, for example depending on who's calling, or you can set a universal ringtone.
| Caution | |
|
Using a headset at high volume may damage your hearing. Adjust the volume level carefully when using a headset. |
|
As long as the phone is switched on, you can always make an SOS call.
Some networks accept calls to emergency numbers without a valid SIM card. Contact your service provider for more information.
| Contacts |
Your contacts are automatically synced with your Google account (provided that you are logged onto your Google account). To manage synchronisation for your Google account, see Backup, p..
You can easily add a shortcut widget for a contact to your home screen.
For more help about importing and exporting contacts, see support.google.com/contacts/.
In case of emergency (ICE) enables first responders to contact your next of kin or any of your stored contacts.
| MyDoro |
![]() MyDoro is an app that lets a helper manage the settings for Doro’s security services, such as the assistance button, Response by Doro and SmartCare by Doro on your Doro 8080. It also gives the helper the opportunity to manage some basic settings on the Doro 8080 of the Senior user from an app or the web portal www.mydoro.com, like settings for sound, display and contacts.
MyDoro is an app that lets a helper manage the settings for Doro’s security services, such as the assistance button, Response by Doro and SmartCare by Doro on your Doro 8080. It also gives the helper the opportunity to manage some basic settings on the Doro 8080 of the Senior user from an app or the web portal www.mydoro.com, like settings for sound, display and contacts.
There can be many helpers, but the first person that sets up an account and invites the Senior user will be the Admin for the CareCircle.
The CareCircle can be just one helper or a group of helpers that can assist the Senior in various ways.
The first helper that sets up an account and invites the Senior user will be the Admin for the CareCircle.
The My Doro Manager helper application that is available through Play Store or App store is for older phone models and is NOT compatible with Doro 8080.
Get the service running by inviting the Senior user you want to help. Always inform the Senior user that you will start the service as it will require actions from the Senior user also.
You can now close the invitation screen.
| Assistance options |
| Important! | |
|
You need an Internet connection to use this service. Contact your service provider for detailed subscription costs before activating. The Doro 8080 user needs to have a MyDoro account to use the service. To be able to use the MyDoro web portal or the app any helpers also need a MyDoro account which they can set up on the web portal. A valid email address is needed to create a MyDoro account Before the assistance button can be used, the user of the Doro 8080 (called Senior) need at least one Helper that has created a MyDoro account and connected with you and by that created a CareCircle. |
In order to possibly make everyday safer, the phone has an assistance button on the back. The assistance button makes it easy to contact the helpers that has been defined in the CareCircle.
| Important! | |
|
To improve security even further, you can subscribe to the service Response by Doro. See more at Response by Doro |
| Important! | |
|
Note that this service is only available on some markets/countries. |
Response by Doro is a new, easy-to-use service from Doro, created to give seniors and relatives extra security, every day. By pressing the assistance button on the Doro phone, the user can easily call for help. First the alarm contacts the relatives, and if no relative is able to answer it is automatically sent to one of our alarm centres, where there is staff on duty 24/7. The service is available on selected Doro phones. However, you as relatives can use any iOS or Android smartphone.
Read more at www.doro.com.
In the event of a trauma, it is critical to have this information as early as possible to increase the chances of survival. Add ICE contact to improve your own safety. First responders can access additional information such as medication and next of kin from your phone in case of an emergency. All fields are optional, but the more information provided the better.
Let somebody you trust manage your phone remotely, for example, this can be requested when you contact Doro support. Allow access so they can remotely administrate and transfer files, help you to perform maintenance tasks and help with problems should they occur.
The person performing the remote help must have Teamviewer installed. Teamviewer can be downloaded and installed for many different operating systems at http://www.teamviewer.com/download/.
| Google search |
| Important! | |
|
You need an Internet connection to use this service. It is recommended to use Wi-Fi connections when available to reduce costs for data traffic. Contact your service provider for detailed subscription costs before activating. |
To go back, tap ![]() .
.
| Applications |
Applications can be a program or game that you can use on your Doro 8080. Depending on market and service provider, the pre-installed applications can vary. Some applications need Internet access. Contact your service provider for detailed subscription costs before activating. Some applications need to be purchased. The cost is shown in the application description as well as if it is free. Using downloaded and installed applications does not cost anything, except if an Internet connection is needed.
Use Google™ Play Store to download and install all the applications you need.
You can send different types of messages from your phone. Here we will explain how to send a text message, but you can also send other message types from the ![]() Send menu.
Send menu.
You can find more help regarding Messages on support.google.com/messages/.
| Important! | |
|
You need an Internet connection to use this service. It is recommended to use Wi-Fi connections when available to reduce costs for data traffic. Contact your service provider for detailed subscription costs before activating. |
You can of course install other email client apps if you wish.
Here we will explain how to send an email to a contact that is available in your contact book.
Selfie means to take a picture of yourself. You can use the front camera to take self-portraits.
| Important! | |
|
You need an Internet connection to use this service. It is recommended to use Wi-Fi connections when available to reduce costs for data traffic. Contact your service provider for detailed subscription costs. |
You can also enter the search word or phrase directly in the Google bar on the homepage.
When you phone is placed in the charging cradle it will automatically enter what is called dock mode. Dock mode will activate the screen saver that turns your Doro 8080 into a side-table clock unless set otherwise. The screen will dim and turn off after a while. Press the home or power button to wake up the screen.
Tap Start now to start the screen saver for testing.
You can listen to music and audio files stored on your phone as well as music from internet.
For more help see support.google.com/googleplaymusic/.
For more help see support.google.com/calendar/.
The phone must be powered on in order for the alarm to function properly.
Slide ![]() to:
to:
Use the timer to count down from a specified time interval.
This feature uses Google Keep™.
For more help see support.google.com/keep/.
Swipe down the notification panel and tap ![]() Torch to turn on the light. Tap again to turn off.
Torch to turn on the light. Tap again to turn off.
Perform simple calculations.
Tap del to delete the latest entry.
Tap clr to clear the result.
| Important! | |
|
You need an Internet connection to use this service. It is recommended to use Wi-Fi connections when available to reduce costs for data traffic. Contact your service provider for detailed subscription costs before activating. |
All pre-installed Google™ applications can be found in the Google folder. Depending on the market, the pre-installed applications can vary. To view more app information, access each app’s help menu.
The cloud is not a physical thing. The cloud is a network of servers, and each server has a different function. Some servers use computing power to run applications or "deliver a service." For example, when you take a picture on your smartphone, it is stored on your phone's internal memory drive. However, when you upload the photos to Instagram, you are uploading it to the cloud.
So remember: The Cloud is a network of servers. Some servers provide an online service, and others allow you to store and access data, like Instagram or Dropbox. Chances are, you encounter the cloud daily. From Google Drive to Evernote, any time you store information without using up your phone's internal data, you're storing information in the cloud.
LBS stands for Location-Based Service and is a software application for mobile devices that requires knowledge about where the device is located. The service can be query-based and it can provide you with useful information such as “Where is the nearest restaurant?”. The service can also be push-based and send you coupons or let you view commute traffic. By law, location-based services must be permission-based. That means that you must opt in (actively say yes) to the service in order to use it.
| Caution | |
|
If you turn off location-based services apps such as map, navigation, and weather applications cannot access your location information. |
|
| Status icons |
|
|
Mobile network |
|
Wi-Fi network |
|
R |
Roaming (in other network) |
|
Bluetooth on |
|
|
Vibrate mode |
|
Data transmission: |
|
|
Silent mode |
|
Error occurred or caution required |
|
|
Flight mode |
|
Alarm active |
|
|
Google Play Store software updates available |
|
System update available |
|
|
Unread email (in the gmail app) |
|
New text message or multimedia message |
|
|
GPS activated |
|
SIM card not inserted |
|
|
Headset connected (without microphone) |
|
Battery level |
|
|
Missed call |
|
Headset connected (with microphone ) |
|
|
Call forwarding on |
|
Call ongoing |
| Safety instructions |
| Caution | |
|
The unit and the accessories can contain small parts. Keep all of the equipment out of the reach of small children. The mains adapter is the disconnect device between the product and mains power. The mains socket outlet must be close to the equipment and easily accessible. |
|
Your device is approved for use on the 4G LTE: 1 (2100), 3 (1800), 7 (2600), 8 (900 MHz), 20 (800), 28 (700), 38 (2600) MHz / WCDMA: 1 (2100), 2 (1900), 5 (850), 8 (900) MHz / GSM: 850, 900, 1800, 1900 MHz networks. To use the device, you need a subscription with a service provider.
Using network services may result in traffic costs. Some product features require support from the network, and you may need to subscribe to them.
Follow the rules and laws that apply wherever you are, and always turn off the unit whenever its use is prohibited or can cause interference or hazards. Only use the unit in its normal user position.
Parts of the unit are magnetic. The unit can attract metal objects. Do not keep credit cards or other magnetic media near the unit. There is a risk that information stored on them can be erased.
This equipment may be operated in all European countries.
The 5150 - 5350 MHz band is restricted to indoor use only.
|
AT |
BE |
BG |
CH |
CY |
CZ |
DE |
DK |
EE |
ES |
FI |
FR |
|
GR |
HR |
HU |
IE |
IS |
IT |
LI |
LT |
LU |
LV |
ME |
MK |
|
MT |
NL |
NO |
PL |
PT |
RO |
RS |
SE |
SI |
SK |
TR |
UK |
The use of equipment that transmits radio signals, for example, mobile phones, can interfere with insufficiently protected medical equipment. Consult a doctor or the manufacturer of the equipment to determine if it has adequate protection against external radio signals, or if you have any questions. If notices have been put up at health care facilities instructing you to turn off the unit while you are there, you should comply. Hospitals and other health care facilities sometimes use equipment that can be sensitive to external radio signals.
To avoid potential interference, manufacturers of implanted medical devices recommend a minimum separation of 15 cm between a wireless device and the medical device. Persons who have such devices should:
If you have any reason to suspect that interference is taking place, turn the phone off immediately If you have any questions about using your wireless device with an implanted medical device, consult your health care provider.
Always turn off the unit when you are in an area where there is a risk of explosion. Follow all signs and instructions. There is a risk of explosion in places that include areas where you are normally requested to turn off your car engine. In these areas, sparks can cause explosion or fire which can lead to personal injury or even death.
Turn off the unit at filling stations, and any other place that has fuel pumps and auto repair facilities.
Follow the restrictions that apply to the use of radio equipment near places where fuel is stored and sold, chemical factories and places where blasting is in progress.
Areas with risk for explosion are often – but not always – clearly marked. This also applies to below decks on ships; the transport or storage of chemicals; vehicles that use liquid fuel (such as propane or butane); areas where the air contains chemicals or particles, such as grain, dust or metal powder.
This product contains a Li-Polymer battery. There is a risk of fire and burns if the battery pack is handled improperly.
| Warning | |
|
Danger of explosion if battery is incorrectly replaced. To reduce risk of fire or burns, do not disassemble, crush, puncture, short external contacts, expose to temperature above 60° C (140° F), or dispose of in fire or water. Recycle or dispose of used batteries according to the local regulations or reference guide supplied with your product. |
|
This device has been tested to comply with the Sound Pressure Level requirement laid down in the applicable EN 50332-1 and/or EN 50332-2 standards.
| Important! | |
|
Mobile phones use radio signals, the mobile phone network, the terrestrial network and user-programmed functions. This means that connection cannot be guaranteed in all circumstances. Therefore, never rely only on a mobile phone for very important calls such as medical emergencies. |
Some products provide GPS/Location based functions. Location determining functionality is provided “As is”. No representation or warranty are made as to the accuracy of such location information. Use of location-based information by the device may not be uninterrupted or error free and may additionally be dependent on network service availability. Please note that functionality may be reduced or prevented in certain environments such as building interiors or areas adjacent to buildings.
| Caution | |
|
Do not use GPS functionality in a manner which causes distraction from driving. |
|
Radio signals can affect electronic systems in motor vehicles (for example, electronic fuel injection, ABS brakes, automatic cruise control, air bag systems) that have been incorrectly installed or are inadequately protected. Contact the manufacturer or its representative for more information about your vehicle or any additional equipment.
Do not keep or transport flammable liquids, gases or explosives together with the unit or its accessories. For vehicles equipped with air bags: Remember that air bags fill with air with considerable force.
Do not place objects, including fixed or portable radio equipment in the area above the airbag or the area where it might expand. Serious injuries may be caused if the mobile phone equipment is incorrectly installed and the airbag fills with air.
It is prohibited to use the unit in flight. Turn off the unit before you board a plane. Using wireless telecom units inside a plane can pose risks to air safety and interfere with telecommunications. It may also be illegal.
Protect your personal data and prevent leakage or misuse of sensitive information
To protect your device from malware and viruses, follow these usage tips. Failure to do so may result in damages or loss of data that may not be covered by the warranty service.
| Care and maintenance |
Your unit is a technically advanced product and should be treated with the greatest care. Negligence may void the warranty.
For devices that utilize a USB port as a charging source, the device's user manual shall include a statement that the device shall only be connected to CTIA certified adapters, products that bear the USB-IF logo or products that have completed the USB-IF compliance program.
The advice applies to the unit, battery, power adapter and other accessories. If the phone is not working as it should, please contact the place of purchase for service. Don’t forget the receipt or a copy of the invoice.
| Warranty |
This product is guaranteed for a period of 24 months and for original accessories for a period of 12 months (such as the battery, charger, charging cradle or handsfree kit) which may be delivered with your device, from the date of purchase. In the unlikely event of a fault occurring during this period, please contact the place of purchase. Proof of purchase is required for any service or support needed during the guarantee period.
This guarantee will not apply to a fault caused by an accident or a similar incident or damage, liquid ingress, negligence, abnormal usage, non-maintenance or any other circumstances on the user’s part. Furthermore, this guarantee will not apply to any fault caused by a thunderstorm or any other voltage fluctuations. As a matter of precaution, we recommend disconnecting the charger during a thunderstorm.
Please note that this is a voluntary manufacturer’s warranty and provides rights in addition to, and does not affect statutory rights of end-users.
This guarantee does not apply if batteries other than DORO original batteries are used.
| Specifications |
|
Network bands (MHz): |
|
|
2G GSM: |
850, 900, 1800, 1900 |
|
3G UMTS: |
1 (2100), 2 (1900), 5 (850), 8 (900) |
|
4G LTE FDD: |
1 (2100), 3 (1800), 7 (2600), 8 (900) 20 (800), 28 (700), 38 (2600) |
|
Wi-Fi (MHz): |
WLAN IEEE 802.11 a/b/g/n/ac, (2412 - 2472) + (5150 - 5875) |
|
Bluetooth (MHz): |
5.0, (2402 - 2480) |
|
NFC, (MHz): |
(13.56) |
|
GPS receiver: |
GPS/BEUDOU/Galileo/GLONASS |
|
Operating system: |
Android 9 Pie |
|
SIM card size: |
nano-SIM (4FF) |
|
Dimensions: |
157 x 74 x 9 mm |
|
Weight: |
175 g (including battery) |
|
Battery: |
3.85 V / 3200 mAh Li-Polymer battery |
|
Image format: |
BMP, GIF, JPG, PNG |
|
Video format: |
AVI, MP4, 3GP, 3GP2 |
|
Audio format: |
WAV, AMR, MIDI, MP3, AAC |
|
Main camera resolution: |
16 MP |
|
Front camera resolution: |
5 MP |
|
Camera digital zoom: |
4x |
|
Display Size: |
5.7” |
|
Display resolution: |
720 x 1440 |
|
RAM: |
3 GB |
|
Internal memory: |
32 GB |
|
External memory: |
microSD, microSDHC, microSDXC max 128 GB |
|
Sensors: |
Accelerometer, Light sensor, Proximity sensor, Gyro Sensor, Compass, Fingerprint Sensor |
|
USB Interface: |
USB-C |
|
Headset connector: |
3.5mm Stereo |
|
Operating ambient temperature: |
Min: 0° C (32° F) Max: 40° C (104° F) |
|
Charging ambient temperature: |
Min: 0° C (32° F) Max: 40° C (104° F) |
|
Storage temperature: |
Min:–20° C (–4° F) Max: 60° C (140° F) |
Bluetooth® is a registered trademark of Bluetooth SIG, Inc.
vCard is a trademark of the Internet Mail Consortium.
eZiType™ is a trademark of Zi Corporation.
Wi-Fi is a trademark or a registered trademark of the Wi-Fi Alliance.
microSD is a trademark of SD Card Association.
Java, J2ME and all other Java-based marks are trademarks or registered trademarks of Sun Microsystems, Inc. in the United States and other countries.
The contents of this document are provided "as is". Except as required by applicable law, no warranties of any kind, either express or implied, including, but not limited to, the implied warranties of merchantability and fitness for a particular purpose, are made in relation to the accuracy, reliability or contents of this document. Doro reserves the right to revise this document or withdraw it at any time without prior notice.
Google, Google Maps™, Gmail, Google Calendar, Google Checkout, Hangouts, YouTube, the YouTube logo, Picasa and Android are trademarks or registered trademarks of Google LLC.
This product is licensed under the MPEG-4 visual and AVC patent portfolio licenses for the personal and noncommercial use of a consumer for (i) encoding video in compliance with the MPEG-4 visual standard ("MPEG-4 video") or the AVC standard ("AVC video") and/or (ii) decoding MPEG- 4 or AVC video that was encoded by a consumer engaged in a personal and non-commercial activity and/or was obtained from a video provider licensed by MPEG LA to provide MPEG-4 and/or AVC video. No license is granted or shall be implied for any other use. Additional information including that relating to promotional, internal and commercial uses and licensing may be obtained from MPEG LA, L.L.C. See www.mpegla.com. MPEG Layer-3 audio decoding technology licensed from Fraunhofer IIS and Thomson.
Other product and company names mentioned herein may be the trademarks of their respective owners.
Any rights not expressly granted herein are reserved. All other trademarks are property of their respective owners.
To the maximum extent permitted by applicable law, under no circumstances shall Doro or any of its licensors be responsible for any loss of data or income or any special, incidental, consequential or indirect damages howsoever caused.
Doro does not provide a warranty for or take any responsibility for the functionality, content, or end-user support of third-party apps provided with your device. By using an app, you acknowledge that the app is provided as is. Doro does not make any representations, provide a warranty, or take any responsibility for the functionality, content, or end-user support of third-party apps provided with your device.
The unauthorised copying of copyrighted materials is contrary to the provisions of the Copyright Laws of the United States and other countries. This device is intended solely for copying non-copyrighted materials, materials in which you own the copyright, or materials which you are authorised or legally permitted to copy. If you are uncertain about your right to copy any material, please contact your legal advisor.
You are entitled to receive a copy of the source code of software licensed under an open source license that gives you the right to receive the source code for that software (for example GPL or LGPL) to you on an appropriate media, against an administrative fee covering Doro AB’s cost for handling the distribution and costs for media. Please direct such request to Doro AB, Open Source Software Operations, Jorgen Kocksgatan 1B, SE 211 20 Malmö, Sweden. To be valid, such a request must be made within three (3) years from the date of the distribution of this product by Doro AB, or in the case of code licensed under the GPL v3 for as long as Doro AB offers spare parts or customer support for this product model.
This phone is hearing aid compatible. Hearing aid compatibility is not a guarantee that a specific hearing aid will work with a specific phone. Mobile phones contain radio transmitters that may interfere with hearing aid performance. This phone has been tested for use with hearing aids, for some of the wireless technologies that it uses, but there may be some newer wireless technologies that have not been tested yet for use with hearing aids. To ensure that a specific hearing aid works well with this phone, test them together before making a purchase.
The standard for hearing aid compatibility contains two types of ratings:
Your device meets the M4/T4 level rating.
This device meets applicable international safety requirements for exposure to radio waves. Your mobile device is a radio transmitter and receiver. It is designed not to exceed the limits for exposure to radio waves (radio frequency electromagnetic fields) recommended by international guidelines from the independent scientific organization ICNIRP (International Commission of Non-Ionizing Radiation Protection).
The radio wave exposure guidelines use a unit of measurement known as the Specific Absorption Rate, or SAR. The SAR limit for mobile devices is 2 W/kg averaged over 10 grams of tissue and include a substantial safety margin designed to assure the safety of all persons, regardless of age and health.
Tests for SAR are conducted using standard operating positions with the device transmitting at its highest certified power level in all tested frequency bands. The highest SAR values under the ICNIRP guidelines for this device model are:
Head SAR: 0.55 W/kg
Body SAR: 1.74 W/kg
During normal use, the SAR values for this device are usually well below the values stated above. This is because, for purposes of system efficiency and to minimize interference on the network, the output power of your mobile device is automatically decreased when full power is not needed for the call. The lower the power output of the device, the lower its SAR value.
This device meets RF exposure guidelines when used against the head or when positioned at least 0.5 cm away from the body. When a carry case, belt clip or other form of device holder is used for body-worn operation, it should not contain metal and should provide at least the above stated separation distance from the body.
The World Health Organization (WHO) has stated that current scientific information does not indicate the need for any special precautions when using mobile devices. If you are interested in reducing your exposure, they recommend you reduce your usage or use a hands-free accessory to keep the device away from your head and body.
This marking on the product, accessories or manual indicates that the product and its electronic accessories (e.g. charger, headset, USB cable) should not be disposed of with other household waste. To prevent possible harm to the environment or human health from uncontrolled waste disposal, please separate these items from other types of waste and recycle them responsibly to promote the sustainable reuse of material resources. Household users should contact either the retailer where they purchased this product, or their local government office, for details of where and how they can take these items for environmentally safe recycling. Business users should contact their supplier and check the terms and conditions of the purchase contract. This product and its electronic accessories should not be mixed with other commercial wastes for disposal. This product is RoHS compliant.
The marking on the battery, manual or packaging indicates that the battery in this product should not be disposed of with other household waste. Where marked, the chemical symbols Hg, Cd or Pb indicate that the battery contains mercury, cadmium or lead above the reference levels in EC Directive 2006/66. If batteries are not properly disposed of, these substances can cause harm to human health or the environment.
To protect natural resources and to promote material reuse, please separate batteries from other types of waste and recycle them through your local, free battery return system.
Hereby, Doro declares that the radio equipment type DSB-0220 (Doro 8080) is in compliance with Directives: 2014/53/EU and 2011/65/EU including delegated Directive (EU) 2015/863 amending Annex II. The full text of the EU declaration of conformity is available at the following internet address: www.doro.com/dofc.
![]()
![]()

![]()
![]()
Copyright © 2025 Doro AB. All rights reserved